You wake up one day to build some cool web app or an ML model, motivate yourself a step further to deploy it or atleast share with your friends. On googling what to do now, you are bombarded with various methodologies and terminologeies. Amidst popular terms like Github, AWS, Heroku, Azure, you suddenly come across a possibly new word, Docker. You read that it is some industry-level standard and popularly used tool, and get excited. You try to install it, understand it but the whole concept goes over the head. You don’t even understand why it exists in the first place. So this blog, made as an effort in response to the same challenge, tries to make you understand and get started with Docker.
So, what is Docker?
Docker is a tool that can package software into containers which can reliably on any system or environment. The issue of portability might not seem an issue during small-scaled self projects, but the hassle of running and testing the code on different machines quickly increase as the project expands. So ultimately, how do we create the environment to run the software and its dependencies on any given machine? That is what Docker answers. But it wasn’t the first one to do that. Earlier, virtual machines were used where each app uses a Guest OS on top of the Host OS to allocate resources for the dependencies and building up the app.
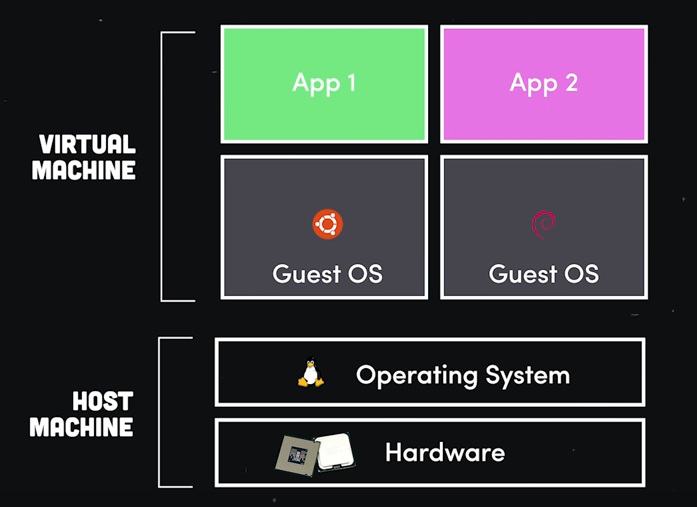
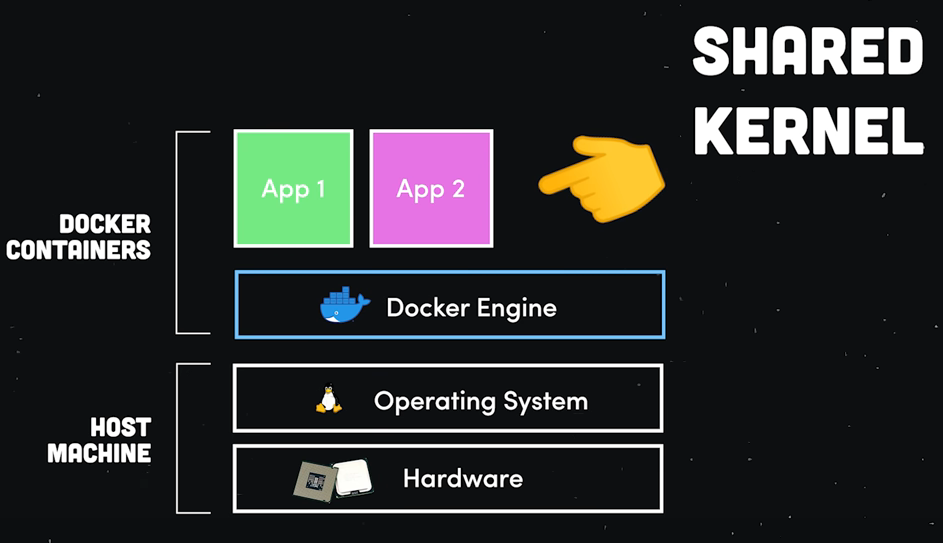
But each VM needs to be allocated substantial amount of resources in terms of RAM and CPU to run its OS. This makes the process bulky, slow and leading to a wastage of resources. Docker makes a slight change here by only virtualising the OS and not the hardware again and again, hence all different apps (or containers) are run by a single kernel. We get shared resources for CPU and RAM, which speeds up the process and makes it efficient.
Installation
On linux, install Docker Engine from here. For Windows/Mac, Docker Desktop is the recommended way as “The Docker Desktop installation includes Docker Engine, Docker CLI client, Docker Compose, Notary, Kubernetes, and Credential Helper”.
Once installed, it is important to understand 3 important concepts related to Docker.
- Dockerfile
- Docker Image
- Docker Container

Dockerfile contains set of instructions/code to build a Docker image, which in turn is a snapshot of requirements and dependencies (similar to a .iso file for OS). A docker container is a running instance of a Docker image.
How to write a Dockerfile?
Dockerfile is the most crucial aspect to run a container, hence keep it at the top level of your project directory. An example of writing to a Dockerfile could be
cd Project
touch Dockerfile
vim Dockerfile
FROM ubuntu

MAINTAINER gurbaaz

RUN apt-get update

CMD ["echo", "Hello Docker!"]
Building and Running our Container
To build our image, simply use the docker build command
docker build -t myapp . # -t is name tag for the docker image
You should see some output like this
Sending build context to Docker daemon  2.048kB
Step 1/4 : FROM ubuntu
latest: Pulling from library/ubuntu
345e3491a907: Pull complete
57671312ef6f: Pull complete
5e9250ddb7d0: Pull complete
Digest: sha256:adf73ca014822ad8237623d388cedf4d5346aa72c270c5acc01431cc93e18e2d
Status: Downloaded newer image for ubuntu:latest
 ---> 7e0aa2d69a15
Step 2/4 : MAINTAINER gurbaaz
 ---> Running in 84b0b8867652
Removing intermediate container 84b0b8867652
 ---> 44e2daa67feb
Step 3/4 : RUN apt-get update
 ---> Running in 0cebc3a5cb2c
Get:1 http://archive.ubuntu.com/ubuntu focal InRelease [265 kB]
.
.
.
Fetched 17.8 MB in 9s (2005 kB/s)
Reading package lists...
Removing intermediate container 0cebc3a5cb2c
 ---> 7b76fc7b5bff
Step 4/4 : CMD ["echo", "Hello Docker!"]
 ---> Running in eaeafffd3930
Removing intermediate container eaeafffd3930
 ---> 69be9a583d7b
Successfully built 69be9a583d7b
Successfully tagged myapp:latest
Docker-Hub: To access tons of resources and help other developers, there exists a similar thing to Github called dockerhub, where you can create an account and then push your local images in the docker repository. Hence try to keep your tag-name meaningful like {dockerhub-username}/{app-name}:{version}.
Now, with the image ready, we can ship it anywhere and run the container, using docker run command.
docker run myapp
>>> Hello Docker!
To re-run the container after making some changes, you need to stop and remove the container, rebuild the image and run it as dicussed above.
docker ps # to get container id of myapp
docker stop <container-id>
docker rm <container-id>
Create network in Docker
Till now we did’nt leverage the full capability of Docker, which is to run more than one apps. For an example, it could be running a backend Django Server and a MySQL server, and allowing them to communicate with each other. Docker does this by having separate isolated container for each app, and enabling communication between them via a network.
docker network create <app-name>
docker run -<flags> --network <app-name> image1
Docker Compose
Docker compose allows one to define different services of the multi-container apps is via writing a docker-compose.yml file. A typical YAML file could look like
version: '2'
services:
  web:
    build: .
    ports:
      - "8000:8000"
    volumes:
      - .:/code
  db: "mysql"
    volumes:
      - .:db-data/foo
Now run the application using the command
docker-compose up -d
To brind the container down, type
docker-compose down
Thats it! You have familiarised yourself with one of the intimidating topics of software world. This blog is merely my own knowledge, but rather a channelisation of what I read and learnt from different resources on the internet. Do check out the references section for them.
Till next time!